Category Archives: Allgemein

Tape recording take two

My first tests with the recording amp on my module and also research showed that you need about 0.5 mA peak for signal mixed with another 0.5 mA peak bias for some profound recorded audio.

Measurement at various tape heads showed an inductance of ~125 mH and ~100 Ohm ESR.

So at 1 kHz you need about 1 Volt for 1 mAmps…
at 10 kHz that makes 10 Volts…
and for the 100 kHz that makes 100 Volts!
-> What was I thinking?

Normally this is done using some transformer coils, or Toko coils as they’re named. Problem is that these cannot be found anywhere. There are various Toko coils to be found on the net but up until now I have not found one with the correct values and especially winding ratio to generate the high voltage bias signal.

So I don’t have appropriate coils, but I do have a few samples of a new fancy semiconductor:
Depletion mode FET withstanding 500 Volts LND150. So let’s build a head feeding stage without coils:

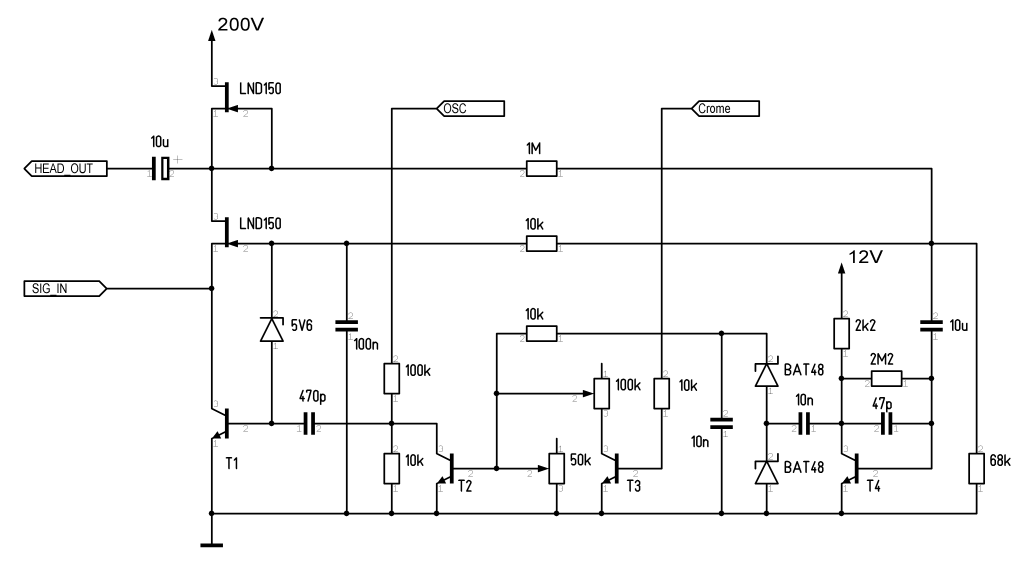
The upper FET acts as current source, the lower one as voltage shifter that fixes the input voltage to about 6 Volts. Of course I’ll feed pure current into it using my Dota-Sims.

T1 controls the sinking current and regulates the output DC voltage to about 100 Volts. It also adds the bias signal.

T4 hasĀ  a double task: it sucks out any LF out of the DC-Feedback loop and amplifies and rectifies it to control the bias level. Look it up at the datasheet of uPC1297 “Dolby HX Pro” controller šŸ˜‰

Simulation looks good so far, hoping to get some first results in at least another year…

Of course I’ll need a 200V supply but that should not pose a problem with my mini switched converters.

Tenor TE7022L Evaluation

Several years ago I had the idea of obtaining an Interface USB Stick for SPDIF output and Input. I wanted to equip my audio stack with a codec for playback and record alike and optical fiber wire is just a cool way to transfer the signals as it also provide an absolute galvanic isolation.

There are hundreds if not thousands of kits and modules available that provide an output via this chip, but none could be found that provides an HD capable input path. So if it does not exist I gonna have to do it myself (and maybe this gonna be my first seller ;).

The chip is from the Galactic Far East Cooperation and they don’t provide very much of info beside the minimum datasheet for basic wiring. Nothing about the settings, config tools or if it’ll need an eeprom. The only way is to get a few and try it. Yesterday was the day to finally know if it works or if I blew 50 ā‚¬ into the wind. Here’s my evaluation circuit:

Result: It Works!
But not out of the box as the standard windows driver does not support Audio Class 2.0. Though I could select 24 bits resolution, the sample rate could not be set higher than 48kHz. After Hours I found a driver package that installs it as TeraDak X2 link and it also provides a control applet that let it switch to 24/96 for playback and record:

The driver was found here: teradak.com/download/2
If not available here’s my local copy: TeralinkX2.zip

I do not yet know if it really can do playback and record at 24/96 at the same time as I’ve read that this exceeds the 12mbps of USB 1.1 ?! Let’s see…

I looped back the output into the Input, started a singal generator and analsyed theĀ input – or tried to as I could not start the record device in 24/96. So IĀ went for 16/96 and got a dithered signal but at least without signs of resampling.Ā Then I set theĀ analzer to grab the samplesĀ in 24bit (the device still at 16bit) and got a clean signal, but the lower 8 bit were zeroed. That means that the Chip correctly receives the 24bit stream and the driver delivers at 24bit, but the transmission over theĀ usb Interface back into the pcĀ isĀ cropped to 16bit!

So I’m now hoping to get an answer from GFEC for support or the whole project is doomed for failure and the ICs where bought in vain šŸ™

Maybe I’ll try the Bravo SA9023 that shall be pin compatible next.

Switched Micro-Power Supply

In this Article I present my Switched Voltage Converter for the low-power range.

For example it can be mounted on a small PCB with 3 pins that can easily replace regular 78XX regulators. That will become the “simple” Version.

20160509_132248

The advanced Version in the image above has some quite impressive features:

  • The nominal output current is 250 mA, which is half of what the simple version can produce due to design reasons.
  • The module is absolutly overload and short-circuit proof.
  • In contrast to the simple version it can Buck and boost the voltage at the same time. The input and output Voltages range from 3V to 35V.
  • The negative output can even create a negative Voltage, though it must be stabilised with an externel Zener Diode.
  • Provides Control Pins for Enable Input and Power-OK Output

And the most important ones, and the reasons why I designed this Discrete Converter is:

  • The Design can be changed and adapted for high voltages using appropriate transistors.
  • The polarity of all semiconductors can be swapped with the opposite ones (NPN to PNP) to build the same converter for negative voltages!

For size reasons there are no output caps onboard and therefore the converter rely on external ones, like 3-pin regulators do too. These are mandatory, starting the circuit without them will immediately destroy it as the stored energy in the coil will induce extreme voltages. (Maybe I’ll fix that in an upcoming smd version of this converter)

I have already used two of these in my MPS-Stack. For example in my Preamp-Module it generates a very stable bipolar supply voltage of + and – 5 Volts independent of the Input Voltage that can be anything from 4 to 35 Volts.


Transconductance Preamp v2

My First Preamp has proofed its quality now for over a year. As I now plan to upgrade my record player with an integrated one, I worked on a improved and simplified version of my first prototype.

I already had the idea for this when my first version wasn’t even built, but I needed some time for basic design evaluation and performance simulation.

The most important change was to get rid of the bipolar supply voltage and a fast self-biasing upon startup while maintaining a low cutoff frequency. Waiting for more than 30 seconds until it gets operational while generating a loud “Plob” was not okay. Luckily I had an brilliant idea how to bypass this problem.

Of course it will again have an High-Z Current output that must be terminated with the proper 620 Ohms.

Here is the simplified schematic for Version 2 of my Transconductance Preamp:

Preamp Unipolar

Over the Xmas holidays I had enough time to solder the new prototype, it fits nicely into a corner of my Pioneer Record Player:

20160509_130209